Showing posts with label Whimsical Divas. Show all posts
Showing posts with label Whimsical Divas. Show all posts
Tuesday, August 21, 2012
Out My Window Tutorial [PTU]
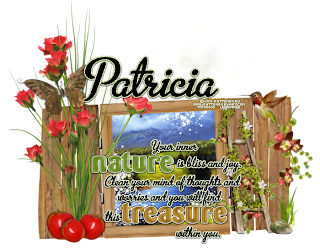
I have a simple little nature tut for you today:
Supplies Need:
Tube of choice: After The Storm by Jon Rattenbury . Find it HERE at The PSP Project.
Scrap kit: Out My Window by Designs by Patricia. Find it HERE at Whimsical Divas.
Eye Candy Gradient Glow HERE
So, let's begin!
Open up the WINDOW frame copy it and paste it as a new IMAGE, close the origional, make your canvas size pretty large here so we have enough room to work >image>canvas size>1600x1300.
Open up FLOWER 1 copy and paste it as a new layer on top of the first frame, close to the left edge.
Open up BUTTERFLY 2, resize by 30% , copy it and paste as a new layer on top of the flowers, add shadow:
V: 0 H: 1
O: 86 B: 3
Open up APPLES, resize by 25%, copy and paste it as a new layer on the very top, near the bottom of the flower..covering the ends.
Open LADDER resize 45%, copy and paste as a new layer positioning it on top of the first frame layer..place it near the right side of the window>image>mirror>, add shadow same settings as before.
Open FLOWERS 2 , resize by 50% copy and paste it as a new layer beneath the ladder.
Open GRASS STONE , resize by 20% copy and paste it as a new layer above the ladder.
Open HUMMINGBIRD , resize by 25% copy and paste it as a new layer above the ladder >image>mirror>.
Open up OVERLAY resize by 25% copy and paste it as a new layer beneath the windor frame.
Open CLOUD copy and paste it as a new layer, send it all the way to the bottom, have over half of the cloud stick out over top of the frame, Now take your lasso and trace around the frame shape [on this cloud layer], selections>invert>edit>clear.
Add your tube, I used the After The Storm by Jon Rattenbury at TPP. Resize 50%, copy and paste into a new layer, send to the bottom..above the cloud, trim excess edges of this tube.
Now crop down as close to the edges as possible without cutting anything off but leave room to add your tube in...resize to 700 on the largest side.
[You can go smaller size on this if you prefer]
Open the Word Art, copy and paste as new layer on top of the tube placing it as I have it show here, I also applied a gradient glow to it with Eye Candy 4000.
Add your watermarks and copyright info.
I also used the same gradient glow on the name [metroscript font] as I did with the word art, positioning it on the top left edge of the tag.
Save and you are done!
If any part of your tag is blurry you can clear it up by sharpening the layer >adjust>sharpen.
I hope you have enjoyed this tut.
Tuesday, July 24, 2012
Marvelous Nature Tutorial! [PTU]
Supplies Need:
Art or Tube of choice: Meadow Glow by Jon Rattenbury. Find it HERE.
Scrap kit: Sweet Life by CBT Scraps. Find it HERE.
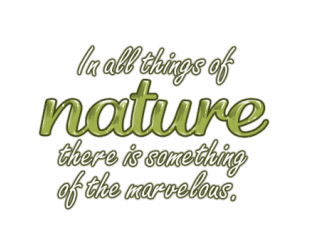
My Word Art..Just right click and save
So, Let's Begin!
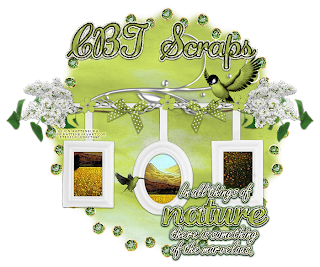
Open up frame 3 copy it and paste it as a new IMAGE, close the origional, make your canvas size pretty large here so we have enough room to work >image>canvas size>1600x1300.
add shadow:
V: 0 H: 1
O: 86 B: 3
Open up swirl 2, rotate right 90 degree, copy and paste it as a new layer beneath the frame.
Open up Element 8 copy and paste it as a new layer beneath the first frame and swirl.
Open up paper 7, resize to 20% copy it and paste as a new layer on the very bottom...Now take your lasso and trace around the1st frame shape [on this paper layer] once you have your circle of marching ants >edit clear.
Open Element 1 [bird] resize 15% copy and paste as a new layer, positioning it on top of the first frame layer, add shadow same settings as before.
Open Element 3 [small bird] , resize by 5% copy and paste it as a new layer on top of the first frame.. use your judgement on where to place it.
Add your tube, I used a piece of art from Jon Rattenbury at PTE...Place the image below the first frame, lasso and trace around each shape on the frame [on this paper layer]
once you have your shape of marching ants >edit clear...do this for each shape.
Now crop down as close to the edges as possible without cutting anything off but leave room to add your tube in...resize to 700 on the largest side.
[You can go smaller size on this if you prefer]
Open the Word Art, copy and paste as new layer on top of the tube placing it near the left bottom edge.
Add your watermarks and copyright info.
Save and you are done!
If any part of your tag is blurry you can clear it up by sharpening the layer >adjust>sharpen.
I hope you have enjoyed this tut.
*The creations that I make whether they are a tag, forum set, or quick page or extras are made by me and my own creativity and imagination. Please do not rip apart, destroy, alter them or claim them as your own. If you do any of these things you are committing an infringement and going against copyright laws. If caught you will be reported to the licensing companies and going against copyright laws. If caught you will be reported to the licensing companies.
Sunday, June 10, 2012
Love Is Tutorial and Extras! PTU TUT

Supplies Need:
Tube of choice: Love Spell by Zindy. Find it HERE.
Scrap kit: Luv U Mom by Dees'Sign Depot. Find it HERE.
Eye Candy Gradient Glow HERE
Chopin Script Font HERE
So, let's begin!
Open up Element 13 [stitched heart frame] copy it and paste it as a new IMAGE, close the origional, make your canvas size pretty large here so we have enough room to work
>image>canvas size>1600x1300.
add shadow:
V: 0 H: 1
O: 86 B: 3
Open up Element 23 copy it and paste as a new layer on top of the heart frame.
Open up Element 76 copy it and paste as a new layer beneath the butterfly, resize by 45%.
add shadow:
V: 0 H: 1
O: 86 B: 3
Open up Element 29 copy it and paste as a new layer beneath the butterfly and rose
Open up Element 63 copy it and paste as a new layer beneath the butterfly and rose and ribbon.
Open up Element 3 copy and paste it as a new layer beneath the first frame...on the very bottom.
Add your tube, I used Love Spell tube by Zindy.Copy and paste the close up image into a new layer BENEATH the heart frame.
Tazke your lasso and circle the very top part of the tube's head [whatever area you want to over lap the top frame] >SELECTIONS>PROMOTE SECTION TO LAYER
now move this layer on to the very TOP of the frames.
Open up Element 4 copy it and paste as a new layer on the very bottom.
Open up Element 28, rotate it 10 degrees to the left, copy it and paste as a new layer on the very bottom..angling it tward the top left area.
Open up Element 26 copy it and paste as a new layer on the very bottom...position it to the right near the edge of the heart.
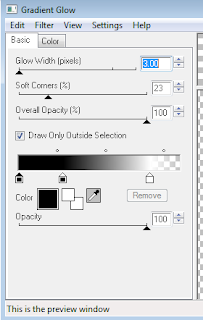
Open up Element 6 copy and paste it as a new layer on the very bottom, position to the lower right of the heart frame, add gradient glow using the following settings:
Open up Paper marked Glitter 2 [light grey] copy and paste as new layer on the bottom beneath the square frame we just put down..Grab your lasso tool and trace out the shape of the
square on this layer, >SELECTIONS>INVERT>EDIT>CLEAR.
Open up Element 5 copy and paste it as a new layer on the very bottom, move it to over lap the glitter paper we just cut out.
Grab your lasso tool and trace out the shape of the
square on this layer, >SELECTIONS>INVERT>EDIT>CLEAR.
Now crop down as close to the edges as possible without cutting anything off but leave room to add your tube in...resize to 700 on the largest side.
[You can go smaller size on this if you prefer]
Open the Word Art, copy and paste as new layer on top of the tube placing it as I have it show here, I also applied a gradient glow to it with Eye Candy 4000...just like the settings before on the 1st frame.
Add your watermarks and copyright info.
I also used the same gradient glow on the name as I did with the word art, positioning it on the top left edge of the tag.
Save and you are done!
If any part of your tag is blurry you can clear it up by sharpening the layer >adjust>sharpen.
I hope you have enjoyed this tut.


*The creations that I make whether they are a tag, forum set, or quick page or extras are made by me and my own creativity and imagination. Please do not rip apart, destroy, alter them or claim them as your own. If you do any of these things you are committing an infringement and going against copyright laws. If caught you will be reported to the licensing companies.
Sunday, May 6, 2012
Alice In Wonderland Facebook Timeline Cover Tutorial! PTU!
This is what we will be making today

Supplies Need:
Tube of choice: I am using the tube supplied with the kit I have to work with
Scrap kit: Beyond Wonderland by Across the Ponds Designs. Find it HERE.
Eye Candy Gradient Glow HERE
DSB Flux Bright Noise HERE
*My Wave template HERE*
So, let's begin!
Now we will add the bottom and come up from there.
Open ACTP_BeyondWonderland_papers (5) resize to 800x800 copy and paste as new layer on our image we just opened. Position it the same way I have mine, so you only see the top roses.
Open ACTP_BeyondWonderland_element (57) [clock] resize to 20% copy and paste as a new layer under the wave pieces near the right edge.
Open ACTP_BeyondWonderland_element (10) [rose bush] resize to 15%>image>mirror, copy and paste as new layer, position near right edge on top of the clock.
Open ACTP_BeyondWonderland_element (47) [butterfly] resize to 12% >image>mirror, copy and paste as new layer, position near right edge on top of the clock.
ACTP_BeyondWonderland_element (33) [plates with cake] resize to 12% , copy and paste as new layer, position near right edge on top of the clock.
ACTP_BeyondWonderland_element (66) [word art] resize to 25%, copy and paste as new layer, position near right edge on the top layer add glow using the settings as I have below

add shadow
V: 0 H: 1
O: 100 B: 3
Open the wave template I have provided, copy and paste it as a new layer, position it to the bottom area.
Open ACTP_BeyondWonderland_papers (19) resize to 900x900 copy, take the magic wand and click on the template layer, you will have marching ants all around this layer then paste the paper INTO the selection.
Duplicate layer, add gradient glow using the same settings below

V: 0 H: 1
O: 100 B: 3
Open ACTP_BeyondWonderland_element (40) [pocket watch]
resize to 12%, copy and paste as new layer, position near left edge.
Open ACTP_BeyondWonderland_element (67) [cards]
resize to 16%, copy and paste as new layer, position near left edge under pocket watch.
Open ACTP_BeyondWonderland_element (59) [yellow sparkles]
resize to 24%, copy and paste as new layer on the top.
Open ACTP_BeyondWonderland_element (13) [Alice]
resize to 45%, copy and paste as new layer, position in center.
Now go to the very first layer we did>selections>select all>image>crop to selection,
add border, >image>add borders> I used black and a size 2.
Add in the credits and add your name to it and we are done :)
But please do take care when making Facebook covers as some licensing places require names to be added to them and some don not allow you to make them for anyone other than yourself.
So always check TOU's!
I hope you have enjoyed this tut, see you next time!
*The creations that I make whether they are a tag, forum set, or quick page or extras are made by me and my own creativity and imagination. Please do not rip apart, destroy, alter them or claim them as your own. If you do any of these things you are committing an infringement and going against copyright laws. If caught you will be reported to the licensing companies.
Sunday, April 29, 2012
Midnight Blue Tutorial with Extras! PTU TUT

Supplies Need:
Tube of choice: Dreams and butterflies tube by AnnaMarine. Find it HERE.
Scrap kit: Midnight Blues by Rabid Designz. Find it HERE.
Eye Candy Gradient Glow HERE
DSB Flux HERE
My word art

[just click save as]
So, let's begin!
Open up frame 1 copy it and paste it as a new IMAGE, close the origional, make your canvas size pretty large here so we have enough room to work >image>canvas size>1600x1300.
Add a black gradient glow with the following settings:

Duplicate image, add gradient glow [use the blue from thye frame] with the following settings:

Now add noise using DBX Flux mix at100%
add shadow:
V: 0 H: 1
O: 86 B: 3
Open up Element 43 resize by 50% copy and paste it as a new layer beneath the first frame.
Open up frame 2 copy it and paste as a new layer on the very bottom...Now take your lasso and trace around the 1st frame shape [on this paper layer] once you have your circle of marching ants >edit clear.
Open up Element 18 copy and paste it as a new layer on the very top.
Open Element 20 copy and paste as a new layer resize 50%, positioning it on top of the first frame layer, add shadow same settings as before.
Open Element 24 , resize by 40% copy and paste it as a new layer beneath the candles>image>mirror>.
Open up Element 12 resize by 50% copy and paste it as a new layer beneath the candles.
Open Element 13 , rotate to the right 20% copy and paste it as a new layer beneath the candles but above the fan.
Open paper 4, copy and paste it behind the 1st circle frame. Now take your lasso and trace around the frame shape [on this paper layer], selections>invert>edit>clear.
Add your tube, I used the Dreams and butterflies tube by AnnaMarine at CDO.Copy and paste the close up image into a new layer on top of the paper we just cut... trim excess edges of this tube.
Now crop down as close to the edges as possible without cutting anything off but leave room to add your tube in...resize to 700 on the largest side.
[You can go smaller size on this if you prefer]
Open the Word Art, copy and paste as new layer on top of the tube placing it as I have it show here, I also applied a gradient glow to it with Eye Candy 4000...just like the settings before on the 1st frame.
Add your watermarks and copyright info.
I also used the same gradient glow on the name as I did with the word art,
positioning it on the top left edge of the tag.
Save and you are done!
If any part of your tag is blurry you can clear it up by sharpening the layer >adjust>sharpen.
I hope you have enjoyed this tut.


Friday, April 20, 2012
Lavender Memories Tutorial! PTU

Supplies Need:
Tube of choice: Suits Me by Barbara Jensen from Scraps N Crap,
Scrap kit: Lavender Memories By Kadoodled By Kaci HERE
Chopin Script Font HERE
So, let's begin!
Open up Frame6 copy it and paste it as a new IMAGE, close the origional, make your canvas size pretty large here so we have enough room to work. Now, rotate frame left 15%.
Open paper 8 copy and paste it as a new layer BEHIND the frame. Now take your lasso and trace around the frame, selections>invert>edit>clear.
Open frame 2 copy and paste as a new layer, positioning it on top of the other frame middle ways in. add shadow:
V: 0 H: 1
O: 86 B: 3
Open paper 1, copy and paste it behind the circle frame. Now take your lasso and trace around the frame, selections>invert>edit>clear.
Open leaves 2, resize to 36% >image>mirror> copy and paste as new layer on very top layer. Plce it to the bottom of the circle frame.
Open the clock, resize to 35%, rotate 10% to the left. Copy and paste as new layer on top of the leaves, add shadow.
V: 3 H: 2
O: 86 B: 3
Open the feather, >image>mirror> resize to 25%, copy and paste as new layer behind the clock.
Open the butterfly, resize to 10%, copy and paste as new layer on top of the clock near the top edge.
Open flowers 2, resize to 15%, copy and paste as new layer on top of the clock near the bottom.
Now crop down as close to the edges as possible without cutting anything off but leave room to add your tube in...resize to 700 on the largest side.
Pick your tube, I used a tube from Scraps N Crap, Suits Me by Barbara Jensen. Add it behind the circle frame layer.
If you want to do what I did here, make her head come out of the top.
Get your lasso tool, encircle the part you want to make come out of the top, Selections>promote to layer>send that to the very top.
Add you watermarks and copyright info. Save it and add your names!
If any part of your tag is blurry you can clear it up by sharpening the layer >adjust>sharpen.
I hope you ahve enjoyed this tut.
Thursday, April 12, 2012
Flowers And Butterflies Tutorial! {PTU}
Flowers And Butterflies

Supplies Need:
Tube of choice. I've used a few tubes by Myka Jelina,
*I used my CILM tubes but you can now find hers only at her store HERE.
*I used my CILM tubes but you can now find hers only at her store HERE.
Scrap kit: Jolie By Butterfly Kisses Scraps HERE
Aka Frivolity Font HERE
My wordart


*just right click and save as png file.
Now let's get started!
Open frame 03. Duplicate and close the original.
Open the hearts image file, copy and paste it onto a new layer, add drop shadow
Open the hearts image file, copy and paste it onto a new layer, add drop shadow
this is the general shadow settings I will be using throughout this tut:
V: 0 H: 1
O: 100 B: 3
Open metal flower 01, copy & paste as new layer placing it over top of hearts.
Open rolled flower number 01, copy and paste it as a new layer on top of the heart and flower
layer on the bottom portion.
layer on the bottom portion.
Open rolled flower number 02, copy and paste it as a new layer beneath the other flower layer.
Open Butterfly 01 resize to 37% copy and paste as new layer, rotate 20 degrees.
Open Winged Heart resize to 40% copy and paste into new layer,
placing it near the bottom of the circle frames.
placing it near the bottom of the circle frames.
Open the Glitter resize to 40% copy and paste into new layer,
placing it under the frames in the same position as the winged heart.
placing it under the frames in the same position as the winged heart.
Open Frame 04 copy and paste into new layer, placing it all the way to the bottom, rotate 10 degrees.
Open paper 02 copy and paste into new layer,
placing it all the way to the bottom under the last frame, rotate 10 degrees.
placing it all the way to the bottom under the last frame, rotate 10 degrees.
Open paper 11 copy and paste into new layer,
placing it under the circle frames, now take your wand and click outside the circle frame
> selections>modify>expand to 7>ok.
placing it under the circle frames, now take your wand and click outside the circle frame
> selections>modify>expand to 7>ok.
Selections>invert and promote that paper section to a new layer.
Now to add your tubes...
I used 3 Myka Jelina tubes I had from CILM.
I used 3 Myka Jelina tubes I had from CILM.
Copy and paste each tube as a new layer, position it inside the circles as you want it to look.
Take your lasso and outline each tube section you want to be inside the circles and
promote it to a new layer by doing what we did before.
promote it to a new layer by doing what we did before.
{selections>invert and promote that section to a new layer}
Add my word art, position is up to you.
Resize if you wish, add your copyright info and save as png.
Add your name and we are done.
I hope you enjoyed this tutorial.
Subscribe to:
Posts
(Atom)
I Support:


My Blinkies

My Other Blogs

I Create For


Tut Writers Inc.

